TAGGING INSTRUCTIONS
For simplicity, gather all of your tagging supplies along with your items to be priced in one area.
You will need the following:
- Hangers for clothing (we prefer wire)
- Safety Pins (1″ or larger, small flimsy pins=dirty lost clothes on the sale floor)
- Packing Tape (for attaching tags to toys & sealing bags, etc.)
- Painters Tape (for attaching tags to puzzles, books, games, boxes)
- Twine/Zip Ties
- Magic Eraser (to clean up shoes and plastic), Iron, Sewing Kit
- White Cardstock (for tags)
- Printer & Ink (or access to one for tags)
Getting Started:
Our computer system is easy to use, and allows you to enter items with a standard keyboard OR with voice entry!
- To enter your items, log in to your consignor portal using the consignor number and password you received upon registering.
- You will go from your homepage to “Work with Consigned Inventory” Be sure to select the correct category for each clothing item.
- Then enter each item description and the price you choose. The more detailed you describe your item, the better. If a tag falls off, your description is the only way to get your item sold. A tag that says, “Crewcuts chambray button-down shirt” is much more likely to be found on the sales floor than a tag that simply says, “Shirt.”
Pricing:
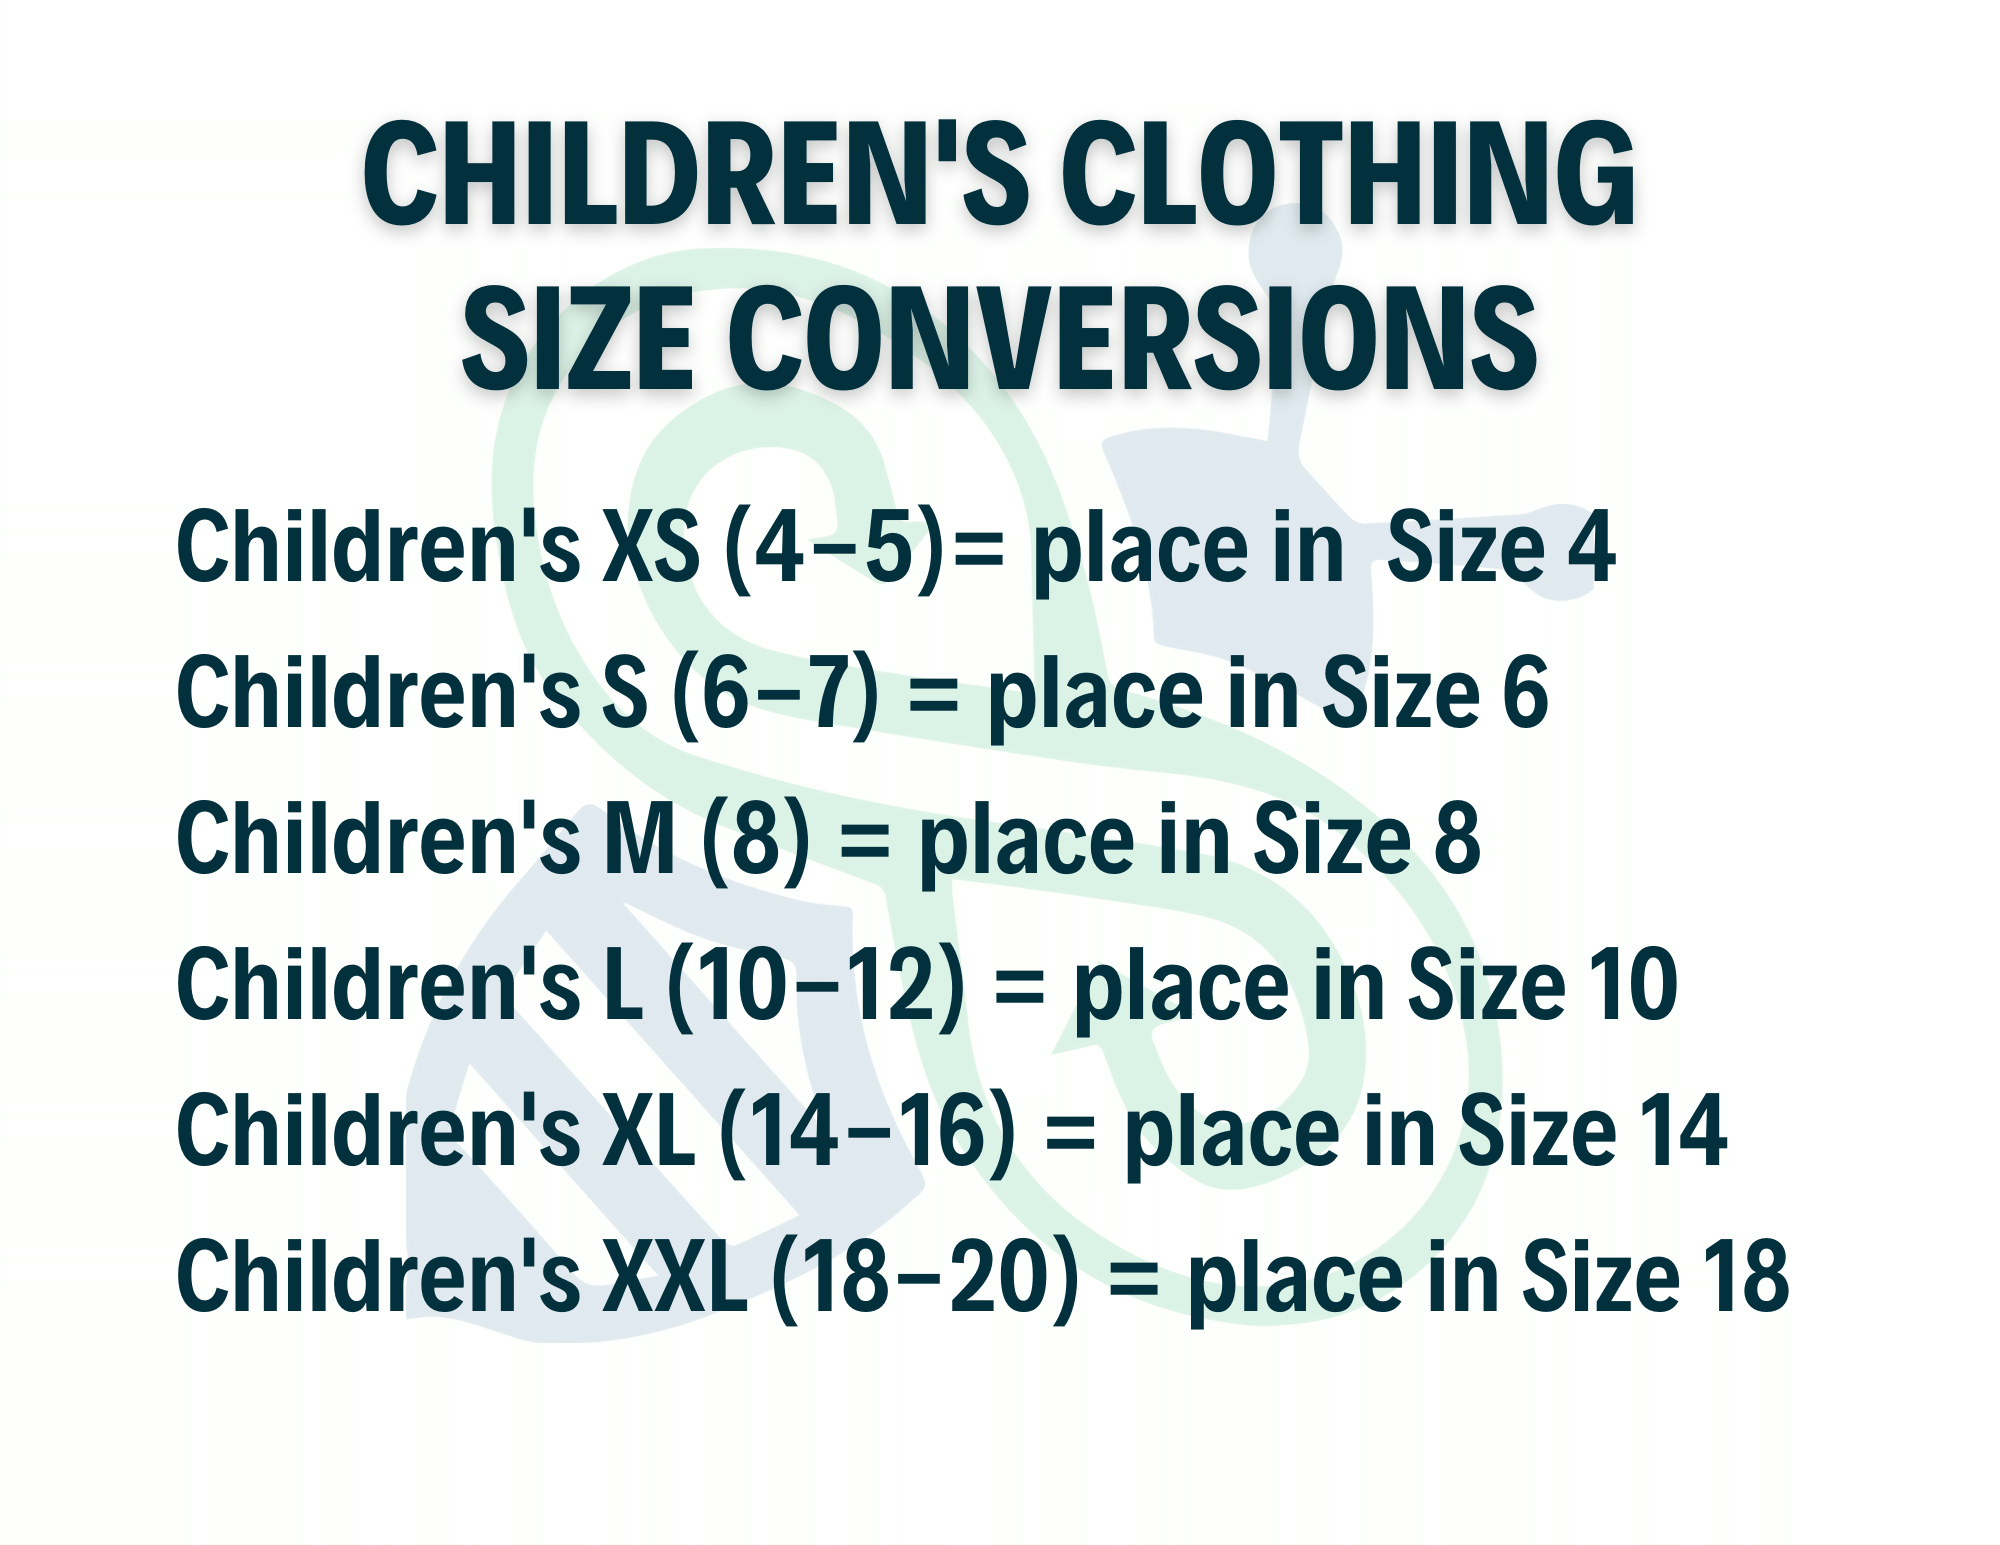
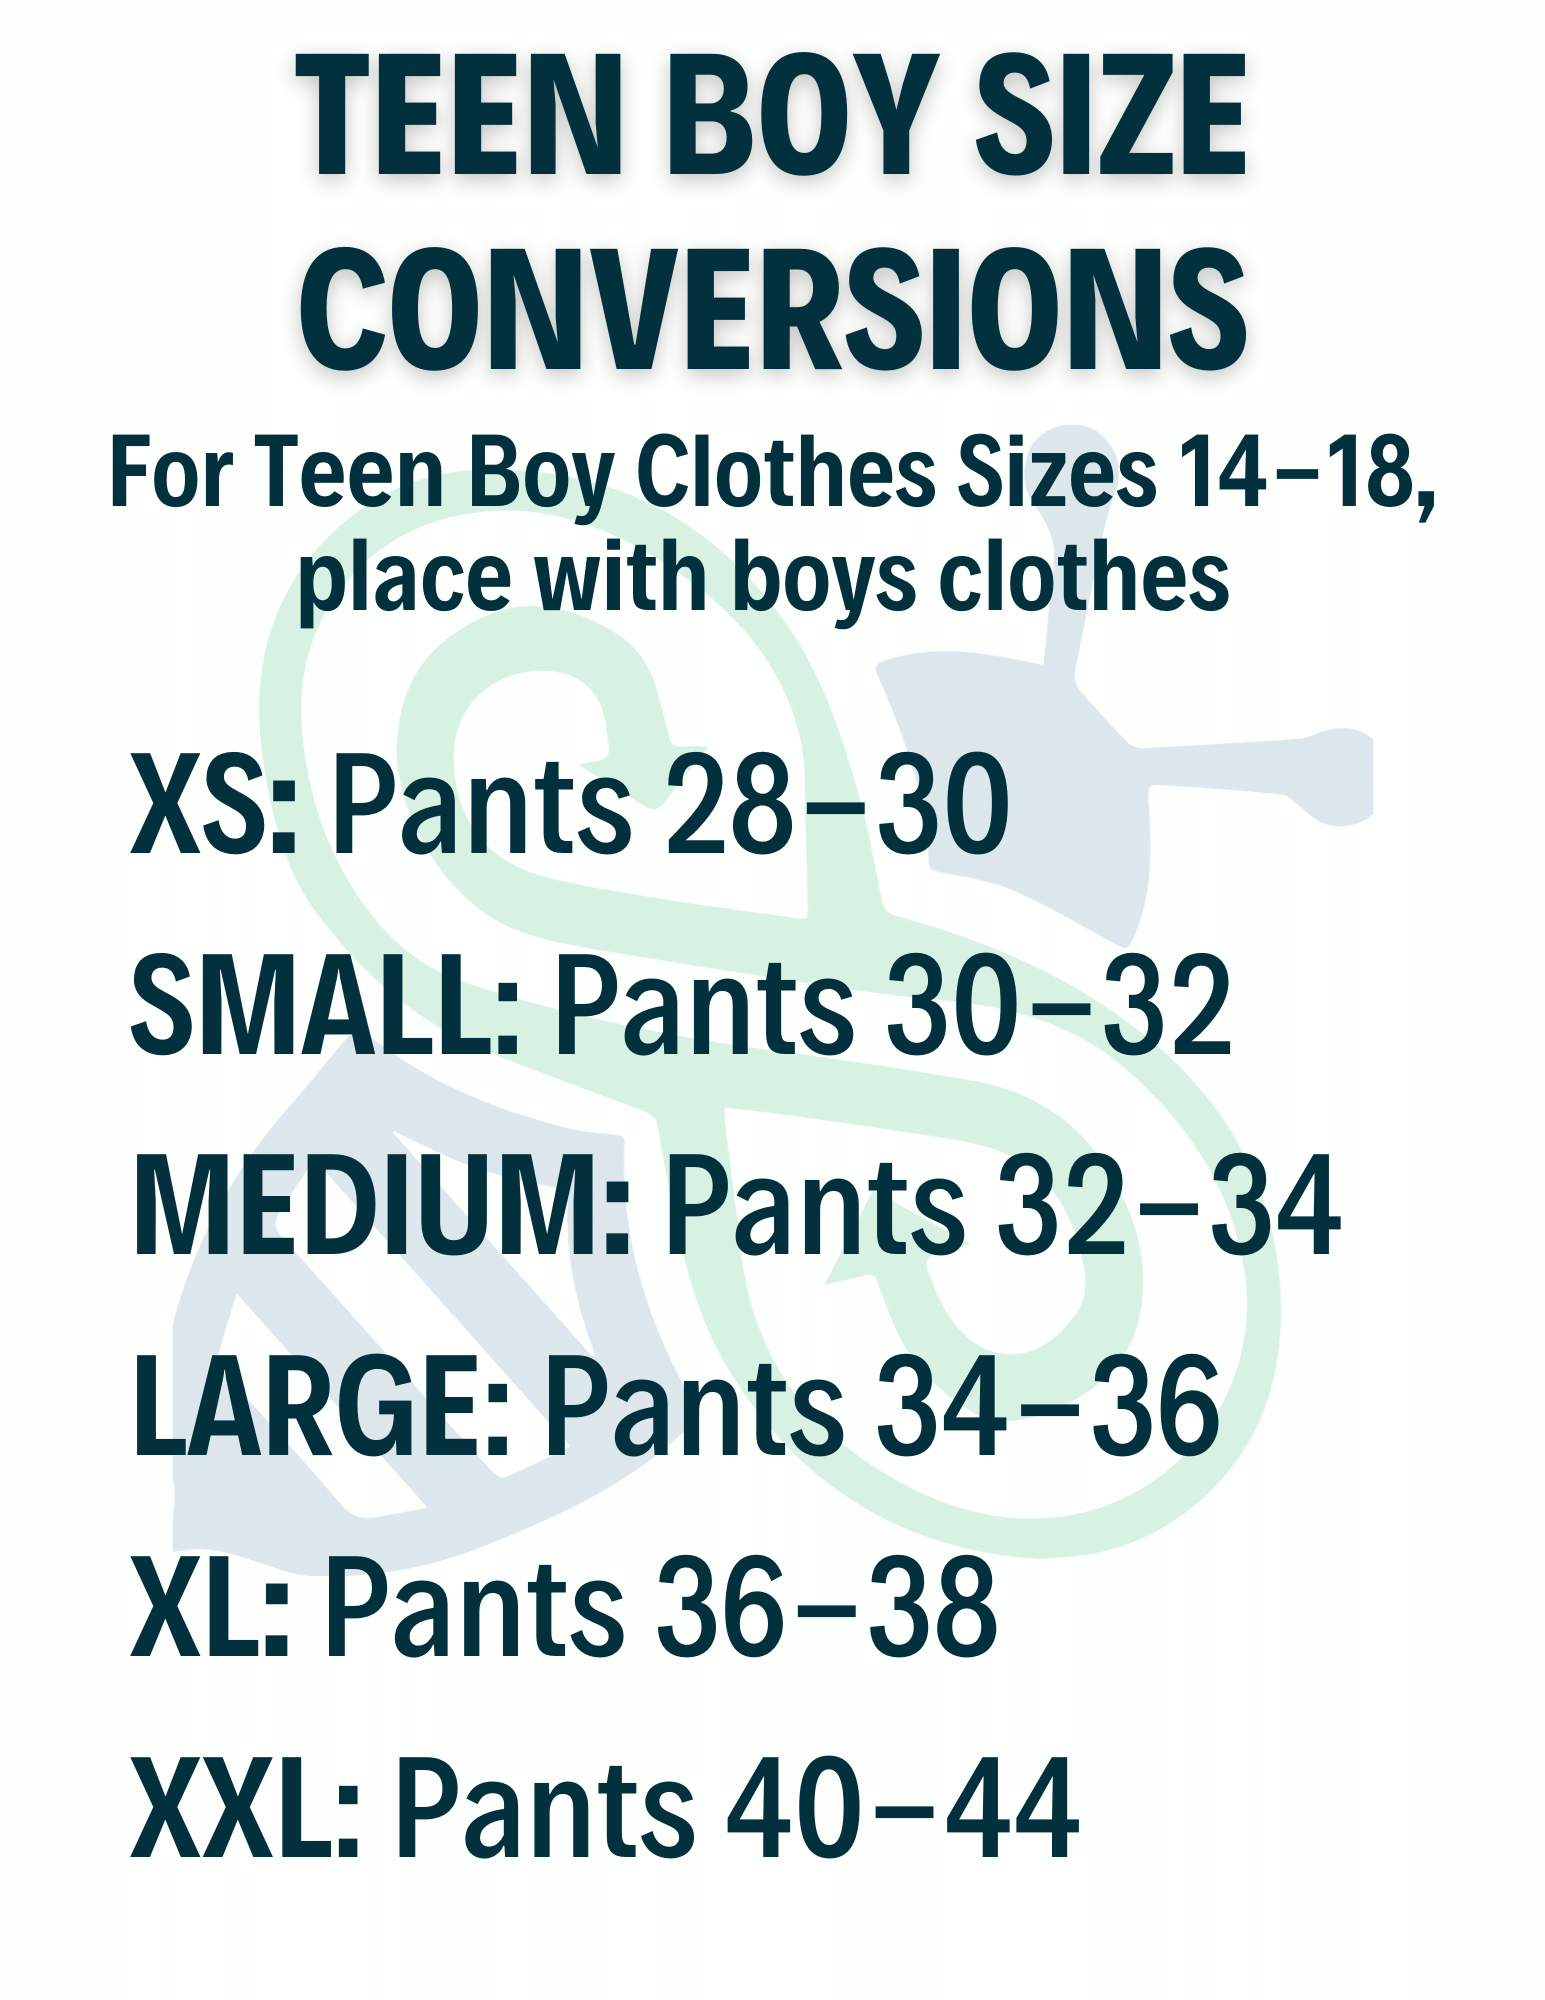
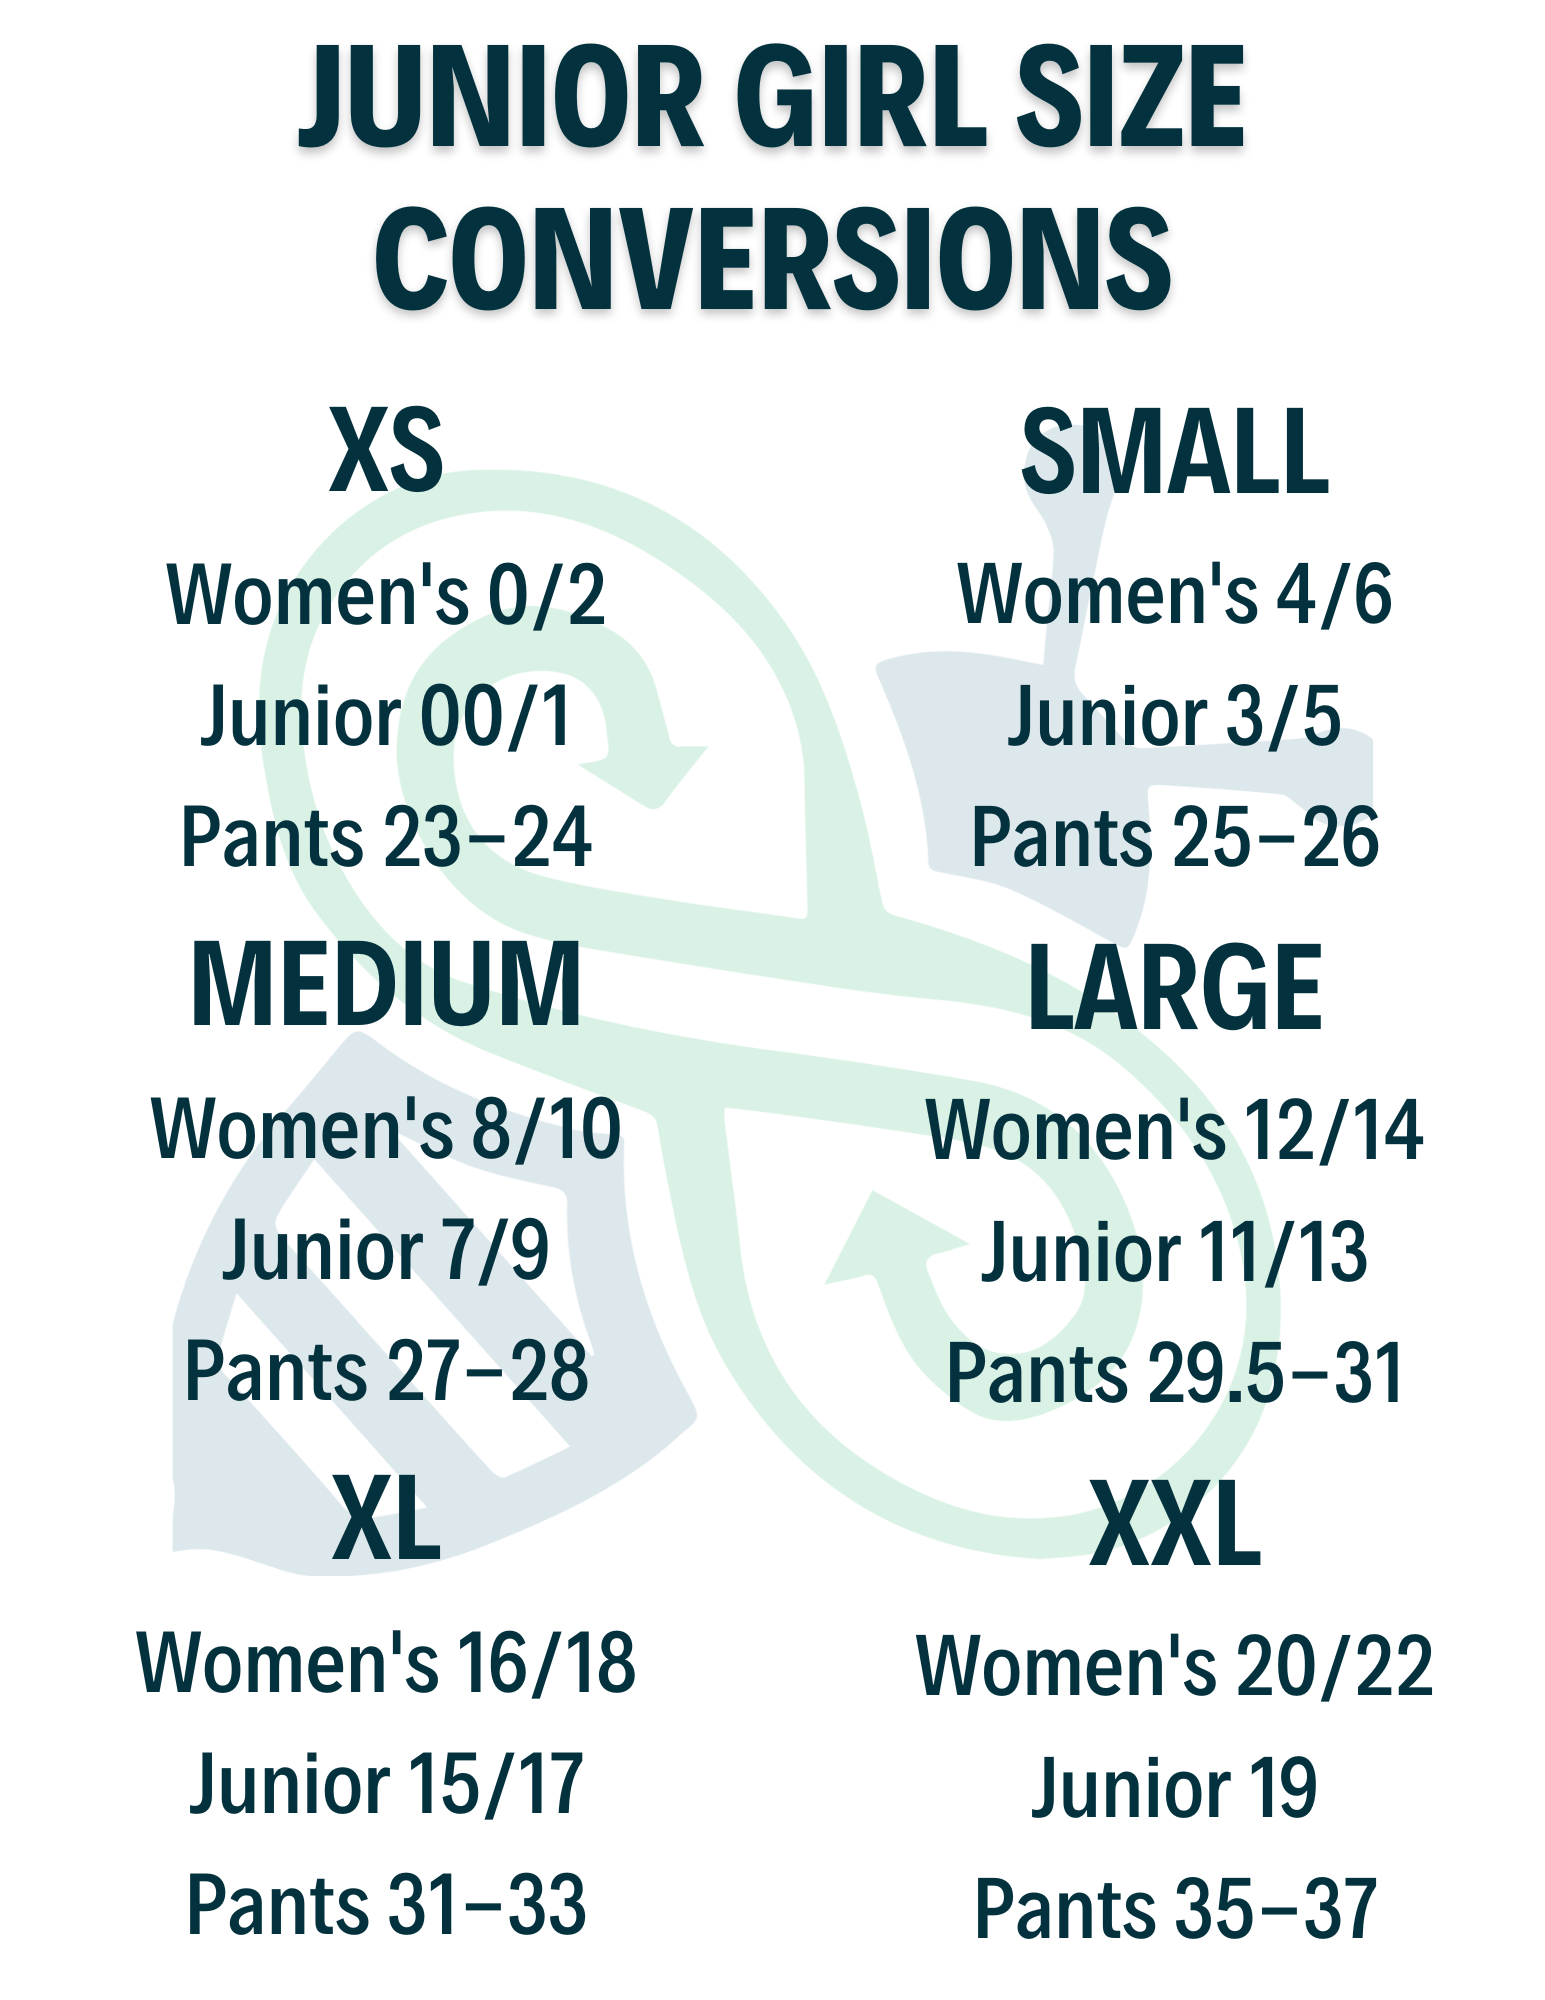
Price to Sell! A good rule of thumb is 1/4 to 1/3 of retail pricing. It’s a great idea on higher ticket items to include the original price or even a photo of the item and price from the web. It’s always better to price competitively and sell most of your items at full price and by choosing to discount, the remaining items are likely to sell on the last day. Here is a great resource guide for size and pricing.
- Ask yourself, “Would I buy these items at the price I am asking? It’s true…you earn more by selling competitively!
- Remember, if you choose to donate your items, there are dozens of local charities benefitting the children in our community that are grateful!
SIZING:
If a clothing item is a range, (ex: 8-10), go with the smaller size. Numerical Sizing is ideal but if you need to use “S,” “M,” or “L” make sure that you CHOOSE YOUTH or JUNIOR and place them on the sales floor appropriately.
LIMITS:
- Wee Trade accepts 100 Hangers per consignor number. If you have sets or multiple items on a hanger with one tag, that counts as 1
- 15 Hanging Items per gender for sizes 0-18mo. (winter coats & costumes do not count towards these limits)
- 10 pairs of infant/toddler shoes per consignor number
- 10 maternity items (can do groupings to sell more with one tag) (winter coats & costumes do not count towards these limits)
- 15 teen hangers/gender (winter coats & costumes do not count towards these limits)
- Bibs: 5 max tags (bundles allowed)
- 200 TOTAL ITEMS per consignor number
- $2 minimum price/item
- 1 Additional Consignor number (with a unique email) is permitted ONLY.
PRINTING YOUR TAGS:
- When you’re ready to print your tags, you will generate a PDF (make sure to deactivate your pop-up blocker). DO NOT SCALE DOWN TAGS. Too small tags do not scan properly at the register.
- Use WHITE or light colored CARD STOCK
- Make sure the printed bar-codes are straight, with clear white space between lines. Smudged, Blurry or incomplete bar-codes will not scan properly at the register.
- If printing on a color printer make sure you choose “Black Cartridge Only” in your settings
- You can send your tag PDF to a printer like Office Depot or FedEx if you do not have a home printer.
- You can print tags any time until your scheduled drop-off time.
PREP YOUR ITEMS:
- Attach tag with a safety pin to the upper right front of clothes when looking at the item. You can use a tagging gun but please ONLY TAG IN A SEAM on the right side of the clothing.
- All clothing pieces are to be hung with the top of the hanger facing left (like a question mark shape.)
- All pants must be pinned to the TOP of the hanger. Do not use pant hangers. Safety pin all sets and accessories securely together. Pants, skirts, and shorts must be pinned to the hanger NOT THE SHIRT. Both pieces need to be viewable without unpinning them.
TIPS:
- Include manuals or directions to baby equipment, toys and games.
- Attach a photo to anything too large to assemble or display.
- Use painter’s tape to attach tags to books, puzzles, etc. so they’re not damaged.
- Include the box only for items that have never been opened.
- Wrap non-boxed wooden puzzles in plastic wrap, tape it shut then tape the tag to the plastic so puzzles aren’t damaged. DO NOT use packing tape directly on wooden puzzles.
- DO NOT put tape over the bar-code of the tags
CLOTHING PREP:
Presentation makes all of the difference in whether or not your item will sell. For clothing, take time to iron, clip threads, check hems…anything you need to do to make your item look great (don’t forget to check zippers, buttons and pockets).
- All clothing must be hung with hangers facing the left, like a question mark.
- Attach the tag with a safety pin to the upper right front of the garment as you are looking at it.
- Single pants, skirts, shorts, etc. should be safety pinned to the top of the hanger.
- For outfits, the waistband of the pants or skirt, should be safety pinned to the back shoulders of the shirt, catching the hanger with the safety pin.
- Attaching matching accessories like bows, hats, etc. (in a ziplock) adds interest to your item.
- Remember, the better your clothing looks, the better it sells! Please take time to wash and iron your clothing. Check for stains, broken zippers, torn hemlines, etc.
- We will not accept any item that is not in excellent condition.
![[Original size] WNC's BIGGEST & BEST (2160 × 1080 px) (7)](https://weetradecarolinas.com/wp-content/uploads/2022/05/Original-size-WNCs-BIGGEST-BEST-2160-×-1080-px-7.png)
Shoes:
Secure shoes together with a zip-tie then attach the tag with a safety pin around the zip-tie. Make sure both shoes are the same size and that the size is correct on the tag. Clean shoes sell!
Toys:
- Use Ziplocs to hold small pieces and secure the ziploc to the main piece (Zip ties are great for attaching).
- Tape ziploc shut.
Puzzles and Games:
- Wrap loose puzzles in plastic wrap so pieces stay in place.
- Make sure all pieces are accounted for and note on the tag.
- Tape puzzles and games boxes shut with painters tape in a way that does not damage the item.
Books:
- Use painters tape to attach tags.
- Do not cover the bar-code.
- If selling multiple books together – use plastic wrap (saran wrap) to secure the books together or large Zip-lock bags or twine.
Large Items:
- DO NOT attach the tag to any large items.
- Bring the tag and a worker will help you put a large claim tag on the item.
- Be sure to clean your items.
- We will not accept muddy bikes and strollers.


